High level multiplayer
Why high level?
Godot always supported standard networking via UDP, TCP and some high level protocols such as SSL and HTTP. These protocols are very flexible and should support everything. However, for games themselves (or unless you are working with a custom server), using them to synchronize game state manually can be an enormous amount of work. This is due to the inherent limitations of the protocols:
- TCP ensures packets will always arrive, but latency is generally high due to error correction. It’s also quite a complex protocol because it understands what a “connection” is.
- UDP is a simpler protocol which only sends packets (no connection required). The fact it does no error correction makes it pretty quick (low latency), but it has the disadvantage that packets may be lost along the way. Added to that, the MTU (maximum packet size) for UDP is generally low (only a few hundred bytes), so transmitting larger packets means splitting them, reorganizing them, retrying if a part fails, etc.
Mid level abstraction
Before going into how we would like to synchronize a game across the network, it would be wise to understand how the base network API for synchronization works. Godot uses a mid-level object NetworkedMultiplayerPeer. This object is not meant to be created directly, but is designed so that several implementations can provide it:
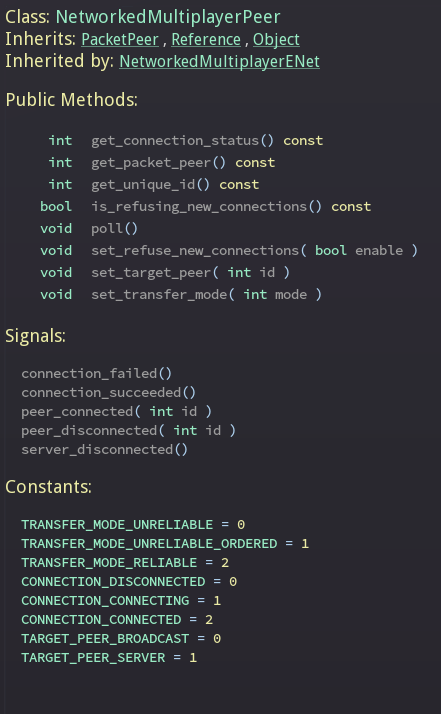
This object extends from PacketPeer, so it has all the useful methods for serializing data you are used to, thanks to Godot’s beautiful object-oriented design. It adds methods to set a peer, transfer mode, etc. It also includes signals that will let you know when peers connect or disconnect.
The idea is that this class interface can abstract most types of network layers, topologies and libraries. By default Godot provides an implementation based on ENet (NetworkedMultiplayerEnet), but the plan is that this could support mobile APIs (for adhoc WiFi, Bluetooth), custom device/console networking APIs, etc.
For most common cases, using this object directly is discouraged, as Godot provides even higher level networking facilities. Yet it is made available to scripting in case a game has specific needs for a lower level API.
Initializing the network
The object that controls networking in Godot is the same one that controls everything tree-related: SceneTree.
To initialize high level networking, SceneTree must be provided a NetworkedMultiplayerPeer object.
Initializing as a server, listening on the given port, with a given maximum of 4 peers:
var host = NetworkedMultiplayerENet.new()
host.create_server(SERVER_PORT, 4)
get_tree().set_network_peer(host)
Initializing as a client, connecting to a given IP and port:
var host = NetworkedMultiplayerENet.new()
host.create_client(ip, SERVER_PORT)
get_tree().set_network_peer(host)
Terminating the networking feature:
get_tree().set_network_peer(null)
Managing connections
Some games accept connections at any time, others during the lobby phase. Godot can be requested to no longer accept connections at any point. To manage who connects, Godot provides the following signals in SceneTree:
Server and Clients:
- network_peer_connected(int id)
- network_peer_disconnected(int id)
The above signals are called in every peer connected to the server when a new one connects or disconnects. It is very useful to keep track of the IDs above (clients will connect with non-zero and non-one unique ID), while the server is warranted to always use ID=1. These IDs will be useful mostly for lobby management.
Clients:
- connected_to_server
- connection_failed
- server_disconnected
Again, all these functions are mainly useful for lobby management, or for adding/removing players on the fly. For these tasks, the server clearly has to work as a server and you have do tasks manually such as sending a new player that connected information about other already connected players (e.g. their names, stats, etc).
Lobby can be implemented any way you want, but the most common way is to use a node with the same name across scenes in all peers. Generally, an autoloaded node/singleton is a great fit for this, to always have access to e.g. “/root/lobby”.
RPC
To communicate between peers, the easiest way is to use RPC (remote procedure call). This is implemented as a set of functions in Node:
- rpc(“function_name”, <optional_args>)
- rpc_id(<peer_id>,”function_name”, <optional_args>)
- rpc_unreliable(“function_name”, <optional_args>)
- rpc_unreliable_id(<peer_id>, “function_name”, <optional_args>)
Synchronizing member variables is also possible:
- rset(“variable”, value)
- rset_id(<peer_id>, “variable”, value)
- rset_unreliable(“variable”, value)
- rset_unreliable_id(<peer_id>, “variable”, value)
Functions can be called in two fashions:
- Reliable: the function call will arrive no matter what, but may take longer because it will be re-transmitted in case of failure.
- Unreliable: if the function call does not arrive, it will not be re-transmitted, but if it arrives it will do it quickly.
In most cases, Reliable is desired. Unreliable is mostly useful when synchronizing objects that move (sync must happen constantly, and if a packet is lost, it’s not that bad because a new one will eventually arrive).
Back to lobby
Let’s get back to the lobby. Imagine that each player that connects to the server will tell everyone about it.
# Typical lobby implementation, imagine this being in /root/lobby

extends Node

# Connect all functions

func _ready():
    get_tree().connect("network_peer_connected", self, "_player_connected")
    get_tree().connect("network_peer_disconnected", self, "_player_disconnected")
    get_tree().connect("connected_to_server", self, "_connected_ok")
    get_tree().connect("connection_failed", self, "_connected_fail")
    get_tree().connect("server_disconnected", self, "_server_disconnected")

# Player info, associate ID to data
var player_info = {}
# Info we send to other players
var my_info = { name = "Johnson Magenta", favorite_color = Color8(255, 0, 255) }

func _player_connected(id):
    pass # Will go unused, not useful here

func _player_disconnected(id):
    player_info.erase(id) # Erase player from info

func _connected_ok():
    # Only called on clients, not server. Send my ID and info to all the other peers
    rpc("register_player", get_tree().get_network_unique_id(), my_info)

func _server_disconnected():
    pass # Server kicked us, show error and abort

func _connected_fail():
    pass # Could not even connect to server, abort

remote func register_player(id, info):
    # Store the info
    player_info[id] = info
    # If I'm the server, let the new guy know about existing players
    if (get_tree().is_network_server()):
        # Send my info to new player
        rpc_id(id, "register_player", 1, my_info)
        # Send the info of existing players
        for peer_id in player_info:
            rpc_id(id, "register_player", peer_id, player_info[peer_id])

    # Call function to update lobby UI here
You might have noticed already something different, which is the usage of the remote keyword on the register_player function:
remote func register_player(id, info):
This keyword has two main uses. The first is to let Godot know that this function can be called from RPC. If no keywords are added, Godot will block any attempts to call functions for security. This makes security work a lot easier (so a client can’t call a function to delete a file on another client’s system).
The second use is to specify how the function will be called via RPC. There are four different keywords:
- remote
- sync
- master
- slave
The remote keyword means that the rpc() call will go via network and execute remotely.
The sync keyword means that the rpc() call will go via network and execute remotely, but will also execute locally (do a normal function call).
The others will be explained further down.
With this, lobby management should be more or less explained. Once you have your game going, you will most likely want to add some extra security to make sure clients don’t do anything funny (just validate the info they send from time to time, or before game start). For the sake of simplicity and the fact each game will share different information, this was not done here.
Starting the game
Once enough people has gathered in the lobby, the server will most likely want to start the game. This is honestly nothing special in itself, but we’ll explain a few nice tricks that can be done at this point to make your life much easier.
Player scenes
In most games, each player will likely have its own scene. Remember that this is a multiplayer game, so in every peer you need to instance one scene for each player connected to it. For a 4 player game, each peer needs to instance 4 player nodes.
So, how to name such nodes? In Godot nodes need to have an unique name. It must also be relatively easy for a player to tell which nodes represent each player id.
The solution is to simply name the root nodes of the instanced player scenes as their network ID. This way, they will be the same in every peer and RPC will work great! Here is an example:
remote func pre_configure_game():
    # Load world
    var world = load(which_level).instance()
    get_node("/root").add_child(world)

    # Load my player
    var my_player = preload("res://player.tscn").instance()
    my_player.set_name(str(get_tree().get_network_unique_id()))
    my_player.set_network_mode(NETWORK_MODE_MASTER) # Will be explained later
    get_node("/root/world/players").add_child(my_player)

    # Load other players
    for p in player_info:
        var player = preload("res://player.tscn").instance()
        player.set_name(str(p))
        player.set_network_mode(NETWORK_MODE_SLAVE) # Will be explained later
        get_node("/root/world/players").add_child(player)

    # Tell server (remember, server is always ID=1) that this peer is done pre-configuring
    rpc_id(1, "done_preconfiguring", get_tree().get_network_unique_id())
Synchronized game start
Setting up players might take different amount of time on every peer due to lag and any large number of reasons. To make sure the game will actually start when everyone is ready, pausing the game can be very useful:
remote func pre_configure_game():
    get_tree().set_pause(true) # Pre-pause
    # The rest is the same as in the code in the previous section (look above)
When the server gets the OK from all the peers, it can tell them to start, as for example:
var players_done = []
remote func done_preconfiguring(who):
    # Here is some checks you can do, as example
    assert(get_tree().is_network_server())
    assert(who in player_info) # Exists
    assert(not who in players_done) # Was not added yet

    players_done.append(who)

    if (players_done.size() == player_info.size()):
        rpc("post_configure_game")

remote func post_configure_game():
    get_tree().set_pause(false)
    # Game starts now!
Synchronizing the game
In most games, the goal of supporting multiplayer neworking is to make sure that the game runs synchronized in all the peers playing it. Besides supplying an RPC and remote member variable set implementation, Godot adds the concept of master and slave network modes.
Master and slave modes
Very similarly to how the pause mode works in regular nodes (with pause, process, inherit modes), nodes can be set a “network mode” with the function Node.set_network_mode(mode). The mode can be: Master, Slave and Inherit.
The Inherit mode assumes the value of the parent node. If the parent node is also in this mode, it will go up in the parenthood chain until it finds a specific mode. If no non-inherit mode is found, Master will be assumed for the server and Slave for clients.
This means that, upon loading scenes, the server is by default the master and clients are the slaves. Checking that a node is in master mode is done by calling:
is_network_master()
If you have paid attention to the previous example, it’s possible you noticed each node being set a role when being loaded in each peer:
[...]
# Load my player
var my_player = preload("res://player.tscn").instance()
my_player.set_name(str(get_tree().get_network_unique_id()))
my_player.set_network_mode(NETWORK_MODE_MASTER)
get_node("/root/world/players").add_child(my_player)

# Load other players
for p in player_info:
    var player = preload("res://player.tscn").instance()
    player.set_name(str(p))
    player.set_network_mode(NETWORK_MODE_SLAVE)
    get_node("/root/world/players").add_child(player)
[...]
Here, each time this piece of code is executed on each peer, the peer makes the node it controls master, and the ones it does not slaves. The modes for each are different on each peer. To clarify, here is an example of how this looks in the bomber demo:
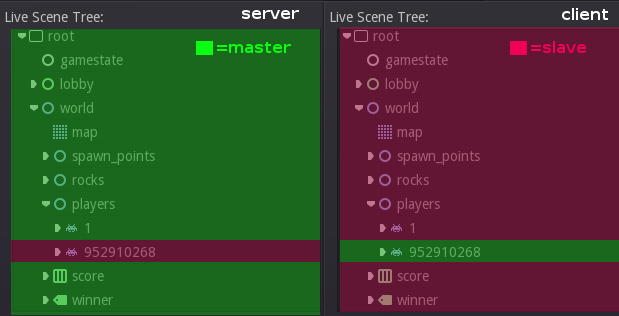
Master and slave keywords
The real advantage of this model is when used with the master/slave keywords in GDScript (or their equivalent in C# and Visual Script). Similarly to the remote keyword, functions can also be tagged with them:
Example bomb code:
for p in bodies_in_area:
    if (p.has_method("exploded")):
        p.rpc("exploded", bomb_owner)
Example player code:
slave func stun():
    stunned = true

master func exploded(by_who):
    if (stunned):
        return # Already stunned

    rpc("stun")
    stun() # Stun myself, could have used sync keyword too.
In the above example, a bomb explodes somewhere (likely managed by whoever is master). The bomb knows the bodies in the area, so it checks them and checks that they contain an exploded function.
If they do, the bomb calls exploded on it. However, the exploded method in the player has a master keyword. This means that only the player who is master for that instance will actually get the function.
This instance, then, calls the stun function in the same instances of that same player (but in different peers), and only those which are set as slave, making the player look stunned in all the peers (as well as the current, master one).